Sunday, September 22, 2013

New Machine Cover

I am soooo excited.  I have almost finished - just needs a little hand work - a cover for my sewing machine.   Saturday afternoon, (a week ago) after returning home from my monthly quilting day with my Bee Friend Group,  I decided that I needed a new cover for my machine.   I have never made a machine cover before, but I have the original one that came with my machine and I can copy that one. What would be so hard about that?  I measured the various parts of the old cover and wrote those down on a sheet of paper because I might want to make more than one and I might need to make some tweaks to the pattern.  I needed the usual:  front, back, sides, but then I would also need a front pocket for the table, a back pocket for the foot pedal and cords (machine and extensions) a couple of tabs for the opening for the handle.  Plus, the sides come up over the top and lap over the handle tabs.  I can do this!   I also thought it would need to be sturdy so I might need to add some canvas to give it that stability.  Not a problem.  I just finished a bag that I had added some canvas to and I had some left over. Let's get this started. 

Looking up at my design wall I made the decision to use some made fabric that I had planned on using to make a pillow for my couch for the cover.  I took that down, used some iron on fleece/batting and quilted that piece.  I cut it into parts and realized I was going to need a whole lot more fabric if I was going to make the entire cover from made fabric.  So, I got to sewing and sewing and sewing.  I would get a piece that I thought would be large enough quilt it, cut out a part and then  I would realize I needed a bunch more.  It takes a lot of made fabric to make this cover.  I used leftover binding to cover the edges on the handle tabs, top of the side pieces that lap over, the top of the pocket, the top and side edges of the table pocket.  Thank goodness I have kept various pieces of binding.  Not knowing what I would be doing with them other than maybe sewing them together to create a scrappy binding someday.  I now have several different bindings on this cover.  Like I said before, I am sooo excited!!!  Here is a look at my new sewing machine cover. 

Okay, just a sec.  I have to figure out how to get back to where the pictures are stored.  This is so frustrating to have to re-figure this out every time now. Hang on I am going to leave you for just a sec.
 
Finally. I had to go back and download it straight from the camera to here.  Never done that before.  I don't know what I did to make my computer not download it the way it used to.  Oh, well.  I got it done.  This front picture shows the table pocket with it's two different bindings - the top (blue) to attach it to the front piece and the red/pink/green binding that is the opening to slide the table into.  I need to find some Velcro and attach it so it won't slide out when I carry the machine.  I don't have any other angles of the cover yet.   It is totally lined - which is why I still need to do handwork to attach the lining to the top section and tab - both pockets are lined, also. It makes me smile when I look at this picture.  This is what I have been working on all week during the one to three hours a night that I have had this week.  I knew I wouldn't have much time this next week and I really, really wanted it finished before Friday and it is!! 
 
Now to finish up another project I started a couple of weeks ago.  It was a pattern I received during a shop hop or opening or something I went to this summer.  I almost gave the pattern away since the quilt picture on the front of the pattern doesn't do anything for me, but there was something about the pattern  that kept calling my name.  I finally pulled some 1 1/2" strips out of the box and sewed them into 9 patches, found some brown fabric for some setting corners and started sewing. I needed some more setting blocks, but I didn't have anymore of that one brown fabric.  I finally found something similar and put together the rows.  What to do for sashing? I auditioned some greens, another brown that was striped and then I saw a fat quarter in pink with a little green and yellow that had some birds on it.  Love the colors in this fabric.  After cutting it up, you can't see the birds, which I like.  This is the perfect sashing and first border fabric.  Now, to find the perfect next two borders.  I did realize after putting the sashing and borders that I should have gone back and trimmed my rows a bit to make the squares points perfectly meet the sashing, but oh, well.  It still looks great to me.  

 
I also need to add the next border round on these two quilts - our assignment is squares. 
 
 
I think I had previously stated that I didn't know what I was going to do with the top block since I didn't have any more of the background fabric, but I have since found another fat quarter of that fabric so, we will see how far I can make that fabric stretch.  On the bottom one, I am thinking it needs more color so I am not going to use the background fabric (well, that is the plan) on this next border and do it in the colors in the middle section.  (can you find the problem with the first block?  I may leave it or take it apart and fix it.  Can't decide what I want to do, but will make the decision before adding the next border)


Friday, September 13, 2013

Low and Behold!!!

I haven't been to Abby's site in well over a week so I had to scroll through several postings to see what was going on in her life.  Low and Behold!!!  My quilts are on her blog!!!  You can see the most recent quilts she quilted for me here.  I was so excited to see them and they are great pictures.  Much better than I could take here at home.  Now I am going to scroll through her blog to see if she posted my previous quilts.  I hadn't seen them on there so I am not sure if she posted them or not, but I am going scrolling! 

Wednesday, September 11, 2013

Estate Sale Finds

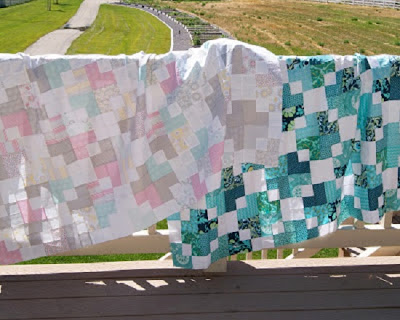
Below are two quilt tops I found and purchased at an estate sale this past weekend.  I am going to take them to my quilt meeting on Saturday to see if anyone can tell me anything about the fabric in them.  I do know there is a variety of fabrics from a silky one, a knit one and some just plain cotton.  It looks like the 30's to me and I think there might be some flour sack fabrics, but I am not entirely sure about that.  We will see what my group has to say about them.  They are sewn by machine - there was a machine for sale, also, but I didn't purchase it - only these two tops and a stool (actually a chair seat without the back.  I have another one similar and I plan on painting these two)   Just wanted to share with you some things since I haven't taken pictures of what I am working on at home.  Maybe tonight will be the night I take my camera into the studio.   I took these at school with my new phone and sent them to my e-mail and posted them on Facebook.  That was a first for me!  I am learning how to use my new phone more and more each day. 


Friday, September 6, 2013

Blocks for Bee Balm Group

 
My camera and my computer are having a major fight.  They are no longer speaking to each other!  It is so frustrating.  I may have to hire a mediator to get them back together.   It has taken me hours to try and figure out how to download the last 4 or 5 pictures of quilts and blocks from the camera to the correct file to be able to use it here on my blog.  I wanted to quickly share these finished blocks before I put them in the mail on Monday (today if I can find time to make it to the post office between school and volleyball) These are the latest blocks from a quilt group called Bee Balm.  There are 12 women in this group and we each have a month.  When it is your time, you are to tell the group what block you would like made and the group makes and sends you those blocks.   Most of the time, the recipient has sent some or most of the fabric for the blocks and you just need to add a bit to make it more unique.  So far, we have done blocks for February through August which these are for August.  This group is about half from the U. S.(Texas, Louisiana, Colorado, Maryland, Kentucky, Mississippi) and half that are international (Canada, New Zealand and Australia), give or take one or two.  It has been interesting so far seeing the various choices.  These blocks are going to be used in a chevron quilt.  The owner sent each of us 4 - 5 inch squares and requested we use 5 - 5 inch squares to make the bright 9 patch.  She also sent the dark fabric, which is a dark gray with small black dots on it.  She has already done several blocks herself and posted them on our blog, Bee Balm.   I just went over there and several people have already posted their blocks.  I will be posting over there soon, also.  This is another great idea for a quilt.  I have so many right now, I don't know what to work on next. 


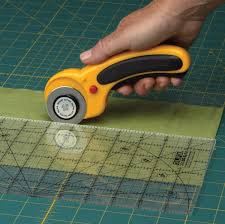
I do know the first thing I need to do is get another rotary cutter. I am still using the first rotary cutter I ever purchased - it's my favorite - and the center screw is getting loose which is making the blade wobble a bit (not much so don't worry) it just sometimes doesn't cut the fabric and I have to go back over it again and again. It's not the blade. I thought that at first and have changed the blade a couple of times. I have also taken the metal locking thingy (that is a technical term) off and bending it a bit more - I felt that the problem might be that it had flattened out too much. That wasn't the problem either. Last night I took it all apart again (15th time) and really examined each part and the wobbly bit was the center post/screw. I might could put some E6000 in there and stabilize it (which I will probably do eventually), but I think I will splurge (with a 40% off coupon) on another rotary. This is not the only rotary I have. I have 3. This one, a small one and one that you have to hold in to get the blade to come out and work.  (I will google a picture) I really don't like this one, but it would work if I could find it.  I have moved it somewhere away from the usual place it rests.  Oh, well, shopping fun!  Except, I can't purchase any fabric.  I bought sooooo much this summer that I have limited myself to NO FABRIC in September.  (okay, I might purchase some at the retreat at the end of this month, but only if I really, really have to have it.  Last year, I didn't purchase any so I know I can control this addiction - a little) 


Well, Swell!

 
I previously posted that I would be working my way through the book, Simply Retro by Camille Roskelley.  I started with the first quilt, Swell.  I knew I wanted it to be really scrappy so I pulled down my box of 2 1/2" strips and began cutting them to the right size.  I then found some muslin laying around the quilt room and  I was off and running.  Cutting, sewing, putting the small blocks together to make larger blocks.  It was all coming together.  I had even posted pictures of a few blocks and some of you commented on the fabric I was questioning.  Everything seemed to be going great.  That is, until I had all the large blocks together and began moving them around on the design wall.  I couldn't figure out how they were supposed to go together to create those little plus sign/crosses. So,  I get the book back out and look at the quilt and . . . I put the large blocks together wrong!!!!!    Here are some pictures of other peoples Swell quilts that are put together correctly.  This how the quilt it is supposed to look. 

 
Picture borrowed from Daydreams of Quilts Finished by Anita
 
this picture is borrowed from Jana Machado's blog
 
 
These are from Chocolate Dipped Quilts and are made by a mother and daughter duo
 
I really love the pale colors in the quilt above.  See how the blocks come together to create those plus sign/crosses?  Love them.  Okay.  I need to make a decision - take the blocks apart and start almost over OR just put it together as is.   Hmmm.   I decided to put it together as is.  I really didn't want to rip out all that stitching (20 blocks) and then sew them back together.  Nope, not going to do it.   I  decided that would take too long and I could make another one later that is correct.  I am calling this quilt, Well, Swell. I did it wrong.  


After seeing all those other quilts on the blogs, I will definitely be making another quilt using this pattern and I plan on doing it right this time.   That pale pear fabric that I questioned earlier, but decided not to replace, really fades out in the picture and is not helped by the pale blue block that is right next to it.  It makes it look like there is an empty spot in the quilt.  Don't worry, I am not going to change it at this time.  That is the completed top in my classroom.  I bulldog clip the top to two yard sticks and then hang the yard sticks up on my board.  Works great!  I am so glad I discovered how to get a picture of my quilts without having other people having to hold them up.  Not that I won't have pics of that in the future. 


Monday, August 26, 2013

Chicken Salad

Someone recently asked if I posted recipes on the my blog.  I usually don't, which may seem crazy to a lot of people since my day job is teaching Culinary Arts.  However, I have to tell about my newest concoction I came up with tonight.  Well, it really is a combination of a couple nights cooking which resulted in tonight's dinner feast so let me back up.  A week ago, I tested 3 chicken recipes in preparation for a couple of classes I was going to teach the next day for teachers. The first class was on thirty minute meals or fast easy meals that they could quickly get on the table for their families without spending a ton of time in the kitchen.  I know that teachers spend the majority of their days at school and a lot of the time don't even think about dinner until they are driving home.  By that time it's just so easy - if you don't have a plan for dinner - to stop and pick something up at a drive through somewhere.  It may or may not be healthy, but it will be expensive.  The other one was on quick breakfasts to get you out of the house and that will stay with you longer (energy wise)  than those doughnuts we are all guilty of picking up on the way to school. 

Tonight I used the last of the chicken breasts to make a quick chicken salad.  (I LOVE a great chicken salad!)  I had a chicken breast that I cooked with some rosemary and plums.  It didn't look good and I won't be doing that again - the plums turned the chicken purple and didn't hold up well in the long cooking time - but the chicken did taste good.  That one goes back to the drawing board to be tweaked.   Anyway, the chicken was still good, if not pretty so I chunked it up (large chunks) and then I found a couple fruit cups in the cabinet leftover from another project (I think from February's retreat).  These were apples - which is why they were still in the cabinet - if they had been peaches, they would have been long gone, but the expiration date was still good, but just barely.  I drained them really well and threw them and the chunked chicken into a bowl.  I seasoned with a little salt and a lot of pepper.  I didn't season the chicken before I cooked it - just forgot since I was in a hurry to get them in the oven.   I pulled the mayonnaise from the fridge and realized that expiration date had already come and gone a long time ago, so I threw that away.  Mayo is not one of my favorite items so I don't use it much at all.   I only use it in making chicken salad and on BLT sandwiches.  That is it!   So, I had to go to my favorite, prime ingredient:  Blue Cheese Dressing!!  I love Naturally Fresh brand Blue Cheese Dressing and I especially love it on chicken.  Try dipping your chicken fingers in it!  I put a couple of spoonful's of the dressing in the bowl and mixed it up.  taste.  Hmm.  Needs something else.  My next favorite go to item is roasted garlic in a jar.  You know - the minced garlic in the jar you can find in the produce section of your grocery store?  If you haven't yet, try the roasted variety.  Lots and lots of flavor in that one.   Yummmm.  I put a little bit - just the tip of a regular tea spoon into the bowl to add some garlicky goodness and that was the ticket.  It was delicious.  I love experimenting with chicken salad and this one will be made again.  I may even add some celery - if I have it in the fridge - or even pecans -  the next time I make this.  Hey, I have some left over and I have pecans in the freezer - yep, they are going in there tomorrow. 

Sunday, August 25, 2013

WIP and Some Gorgeous Guys

My Quilt group has decided to do several different projects for the rest of this year.  The first one is a stay-at-home-round-robin that we are calling Borders, Borders, Borders.  The rules to this are as follows: 
1.  make/have a center block
2.  draw from the sack a border detail
3.  add that border before the next meeting
4.  bring block to the next meeting to show and tell
5.  draw from the sack the next border detail
6. repeat steps 3 - 5
 
It's like a round robin, except you are the only one working on your quilt.  We are hoping this will allow the newbies to increase their confidence and skills without making them too nervous by working on someone else's quilt. 
 
We have put the following into a paper sack - triangles, squares, rectangles, curves, on-point, anything goes.  We are only going to have 4 rounds, so we have no idea what will be pulled next.   If the "on point" doesn't come up in the next turn, we may pull it from the sack since the quilt will almost triple in size if it's for the last round.  (or even the third round)  So, for the August meeting I had to have a block.  Hmmm.  I had a few orphan blocks that I could use and took them to the meeting with me.  I also had some fabric that I pulled and put together and thought it would make a fun quilt and block.  Lots of reds, pinks, oranges and yellows with a little lime greens and a couple of blacks.  Then for the background a white with black and gray words and a white with gray bicycles and a touch of pink and yellow.  Now, what to do with it.  I didn't know, but I knew I needed to have a block soon so off to the meeting I went.  Since we always have workday/meetings I knew I had some time to make a block before the lunch meeting, I just didn't have a plan.  I thought I might do something really off the wall and modern with these fabrics until I was scrolling through Facebook that morning looking for a picture someone posted to show a friend and saw a block on Quiltmaker Magazine's posting - August 17th.  I liked the block and quickly decided to make it.  There were no instructions, sizes or anything, but I was going to make my version of this block.  I knew that whatever size the 4 patch turned out to be would determine the size of the 1/2 square triangle blocks.  Not a problem.  Sew some strips and squares together, make my 4 patches, measure and make the 1/2 squares.  Now to determine what size to make the crossing middle section.  Do I make it the same size?  The same width? narrower?  What do I want to do?  It was all up to me.  Then I decided to put in the black with the gray dots instead of another warm color or the green.  LOVE!!!  I can't wait to do some more on this block.


From the sack we drew out triangles.  Great!  All this round has to contain is one triangle.  I know I want to add more black in to this quilt, but I also want to add more green.  I make a couple of green 1/2 squares and am not pleased when I put them up on the wall.  It looks okay, but that is just it.  It looks okay.  I make a couple of  1/2 squares with the black fabric and decide to use them all the way around in a sawtooth pattern. 


The quilt top is starting to hum along now.  I do know that whatever we pull from the sack in September, I want to add in more color and possibly a different background - probably still in the black in white family or gray and white, but I most likely won't add anymore black just yet.  This block currently measures 21" square.  As usual I am allowing the quilt to let me know the size it is meant to become.  Just letting it grow naturally. 
 
I am also working on my first project from Camille Roskelley's book, Simply Retro.  This is the first project in the book titled, Swell.  I am using scrap 2 1/2" strips from my box along with muslin.  This is what I have so far.

 
There are two blocks up on the wall that have a pear and white print that are really fading out and I may want to go back and replace them before sewing it all together.  I have a lot more to go before this one is finished.  I know there is a group on-line that is working their way through this book, but I am so far behind them that I am not even going to try and keep up, but I do want to make every quilt in this book.  They are all so wonderful.  Speaking of wonderful quilts, I should be getting my quilts back from the quilter any day now.  I can't wait to see them.  Since I haven't put any binding on any of the quilts I got back from her in June, I will have my hands full with binding pretty quickly.  I know I cut the binding for two of the quilts I sent previously, but can not for the life of me find it anywhere.  I keep looking in the same places, because I thought I had it all done, but it isn't there.  I don't know anywhere else to look right now so will have to come up with an alternate binding for those two batik quilts.  bummer. 
 
On a brighter note, my sister and her three boys went to Florida for an end of summer trip and she took some awesome pictures of the boys that I want to share with you.  Here are three of my handsome nephews:


Aren't they all gorgeous? I love these pictures.  Usually they either don't want to have their picture made or are making silly faces in them.  These are perfect and natural.  Now, maybe my other 4 nephews will take some great pictures and I can post them here for everyone to enjoy, also.  I only have one recent picture of them.  They all have their tongues sticking out after eating snow cones!  I won't post it.  Nobody else needs to see blue, green and bright red tongues.