Showing posts with label round robin. Show all posts

Saturday, September 15, 2012

Sewing in the Rain


This is the view out my window this morning.  I am sitting here with the window open listening to the rain coming down, the ducks quacking away and the sound of traffic driving through rain soaked streets.  Thank goodness the rain is coming from another direction and I am able to have the window open.  The picture looks a little blurry, but that is because I am taking it through the screen.  It really is a beautiful sight.  The park is once again decked out in thousands of American flags in remembrance of the 9/11 terrorist attacks.  That one flag that is all stretched out is caught on the little tree and it made me smile this morning so I thought I would share it with you. 

I slept in a bit this morning and then hit a couple of estate sales around 10.  (I love half price Saturdays!) Yesterday I got a small Le Crueset skillet they had already marked down and spotted a cut glass serving tray however, I didn't want to pay the full price of it.  I had planned on getting there early this morning to get it for half, but I slept in.  I did get some other great cut glass/crystal pieces to use as serving pieces for the restaurant. I have quite a collection now since I added four more trays, a wonderful heavy bowl and a crystal (yes, real crystal) candy dish.  I also scored on some unopened ink pads for rubber stamping.   I don't do much of that anymore, but I do like to make some cards from time to time and a lot of my ink has dried up.  I am hoping this ink is fresh since it is still shrink wrapped.  However, for a couple of dollars for about 8 packages, I couldn't pass it up.  Below is the my spiderweb quilt.  I will be working on adding an outer border this morning - okay, this afternoon.  Didn't realize it was already after 12.   I am thinking I will add a piano key border using my leftover strips - I still have a full box of multiple size strips that I cut over 12 years ago for a Fons and Porter Crazy Cabin quilt and this is my third or fourth quilt I have made from that box of strips.   When I bring the box to our Bee meetings and work on a strip quilt, my friends come and dig through the box and take what they want and then add more strips to my stash.  It's fun to pull out a fabric and wonder where it came from since I know I didn't buy that fabric.  I have boxes that are designated to 1 1/2", 1 3/4" and 2 1/2" only, but in this box, I have from 1" to 4" strips.  I don't worry about the width when I am working on a strip/string quilt.  I just use whatever I pull from the box. 

My friend, Molly, introduced me to one of her quilts that is string pieced and I am going to start this week.  However, I want it to be in some of the modern fabrics and none of those are in this stash box.  However, any leftover strips from that quilt will join this box when I finish it.  It also, is paper pieced.  I have a ton of little paper pieces all over my studio floor and I have got to get the vacuum out before I get back in there today. 


Okay, I may not get this quilted before Thursday to take with me for the Botanical Conundrum so I thought I would post a picture anyway.  This is from a challenge by the Modern8Create group.  I took a picture of my Puffs tissue box and then stretched it out, to make these "flowers"  I added a bit of yellow/gold flat piping that really gives it a boost of color.  Who knows.  I might get a some inspiration and start quilting it tonight or tomorrow.  If not, it can wait until the perfect time. 

The other item I need to get quilted is my round robin wall hanging.  This one had a hard time in the rounds and was totally re-made at one point in the rotation.  The center block is about 5 inches so it's not a large wall hanging.  I am not sure how I want to quilt this one either, probably something simple.  I might even add a dark border before I do that.  (that thought just came to me.  I hadn't planned on adding anything else, but I might like having that Kaffe Fasset fabric on the outside.) 


Along with all of this, I desperately need to get going on my September (July, August and March) Stocking Swap items.  How are you coming along with these?  Aren't you glad now that November and December are non-sewing months?   Push to have everything done, collected and packaged by the first week in December so when you get your exchange partner you can ship off that week!! 

Have a great day sewing in the rain - or whatever the weather is like where you are.  

Monday, May 21, 2012

Round Robins

I might have said this before and if I have repeated myself too much, I apologize, but my Bee Friends Quilt Group's newest project is round robin quilts.  We have done this a few times in the past, but it has been more than 10 years since we last challenged ourselves this way.  I love working on round robins and I love the challenge each new quilt presents.  Here are the two latest ones I have worked on.  The first one with the brown star in the center, I was supposed to add squares.  I planned and debated about whether or not to make 9 patches or just single squares or four patches.  Once I decided on making four patches, I then worked on the pattern within those four little squares.  Below is the pattern I came up with to bring more light fabric and some teals into this quilt.  It has one more round to go and has already been turned over to the next player for an "anything goes" border. 


I am the last one to add to the quilt top below.  In my "anything goes" border, I knew that I wanted to add some more of that "pink/salmon" fabric to help bring more color into this very dark quilt.  The first pink border was one of my fabrics that I volunteered during our last quilt-in.  However, I didn't have enough of it left to add a larger (or even smaller) border.   I found a fabric that is similar in tone and value to the first fabric and in the picture and in real life, it works really well.  So well that I wished I had more of it to just put an extra large pink border.  That was not the case so I needed to find something else to put on the outside.  I also didn't have enough of the gold fabric (another one I donated at the quilt-in), but didn't really want to detract from the awesome way that fabric shines in this quilt.  So, back to the fabric bag that came with this little quilt.  Hmm.  It is all upholstery fabric and most of it is cut into 4 inch squares.  I lay out a few of those squares and decide, nope that is not the way I want to go.  However, there was a piece about 14 inches wide - give or take curved edges - that I could possibly use.  Thank goodness I was able to square it up and then figure out how wide I could make this border with the fabric I had available.  Of course, I made the first cut too small.  I wasn't even thinking!!  Thank goodness I could piece it together and make it work.  Even though this is really a simple addition to this quilt top, it really finishes it off and that is what this round is all about.  It is a really rich and elegant quilt top and I can't wait to see how she finishes it off and whether she makes a wall hanging out of it or keeps on adding to it to make it into a larger bed spread.  (or even a table topper) (because, beside the pink and the gold fabric - everything else is upholstery fabric)


Okay, that is it for the night.  I have to be at school for a meeting extra, extra early so I better get into bed right now!!! 


Sunday, April 22, 2012

No Agenda Saturday

This weekend has been wonderful.  It's the first Saturday in a long, long time that I didn't have anything particular to do.  I didn't have a deadline or somewhere I had to be or anything specific on my agenda.  I had no agenda!!  It has been a wonderfully relaxing weekend.  Yesterday, I got up (okay, couldn't sleep in much - got up at 7:30) Decided I wanted a coke (don't have any soft drinks in the house) so I went to my favorite Stripes and got me my favorite mixed drink - coke and diet coke mixed in one cup.  Their breakfast platter was calling to me so I purchased one along with a newspaper.  I can't tell you how long it has been since I have purchased a newspaper because I don't even remember when it was, it was that long ago.  (okay, maybe a month ago)  I quickly looked through - not much in our paper - and looked to see if there were any estate sales that day.  Sure enough there was one.  So, taking my breakfast and my coke, I set off to go to the estate sale.  Got there in plenty of time to sit and enjoy my breakfast in the car, with the windows down and the cool morning breeze!  It was delightful. 

The last estate sale I attended, I purchased three metal file boxes that I plan on re-painting (have finished one) and when I was going through the big one I found $80.  That's right, eighty dollars!!  I think I paid one dollar for that box.  I also found some really old postcards that I need to put on e-bay.  They were all wrapped up in plastic so they are in really excellent condition and they have the one cent postage marking on them.  It will be cool to find out if they are worth anything.  So, my $79 profit from that box may grow a bit.  However, I usually go to estate sales to see if there is anything to add to my collection of cut and pressed glass serving pieces.  I picked up three bowls for a total of $5.41.  Not a bad haul! 

I finally went by Hobby Lobby and got me a new cutting mat along with some Kona Espresso fabric and a few remnant fabrics on clearance.  My intention was to work on some new projects.  Instead, I got on the computer and played a few games and answered some e-mail and tired myself out!  Just in time for a long, long nap!!  that is what these Saturday's are for, aren't they?  Napping??  I needed it and really deserved it.  Needless to say, since most of you know me, I didn't get into the studio (sewing room) until later that night.  Here are some things I worked on last night. 

My quilt group is doing a round robin and I added my border to Gerrie's quilt top.  I don't have picture of how the top looked before I got it. Wait, I will be back.  I am going to try to crop it and see if I can show you what it looked like before I added my border.  Be right back . . . . . .

Here is what it looked like when I got it.  The center star was made by Gerrie.  Liz put it on point by adding the strips around the star along with the orange, turquoise and black/brown fabric.  The next border is to be triangles.  I drew out some flying geese on the sides and thought that would work to continue the black/brown fabric making it look like a box.  Then I couldn't decide what else to do, so I used the orange again along with a similar background batik - there wasn't enough of the original fabric in her box to use the same background batik and here is what it looks like now . . . . . .oops, it replaced the original picture with this cropped one, just a second, while I download the original off the camera again .  . . . . . . .


I really like how the orange looks like boxes on point with turquoise squares inside.  This is looking really great!  I can't wait until Saturday to see what everyone else did with their triangles.  And, to see how my little quilt is progressing! 

The next thing I worked on was the color challenge from 15 Minutes Play.  Victoria is posting a new color each week for you to play with.  I was behind, since I haven't read many blogs lately and didn't know about this until Friday.  I chose to use my own favorite pattern for each of my blocks and use the Kona Espresso that I got at Hobby Lobby for my background.  Here is the Mauve block:

It is the only one all put together.  I may off set the rest of the blocks and have them share some of the squares so there isn't sooo much solid brown squares.  I may change my mind later and decide to finish each block and then put them on point with some sashing, but at this time I am leaving my options open.  Which totally explains why the next two blocks look so wonky.  They aren't totally sewn together, but you can get an idea about the colors.  Here is the Ochre:


And the Avocado:


I can't wait until Wednesday to get the next color to use in my blocks.  In the meantime, I will work on the April Challenge from the Modern 8 Create blog.  I am not one of the 8 members, but it is fun to see what they are doing and try my own version of their challenges at home.  (not that I have been able to do much before now, but I always enjoy seeing what they do)  Here are their rules from their website for the challenge.  Go by there and see what everyone is making.  It is a lot of fun.  I have only gotten to rule number one and am going to work on rule number two right now.

April Challenge “Rules”

1) Take a photograph. Take a picture of something around your house (inside or out makes no difference).
2) Crop it to pull out a section that is nearly unrecognizable as a “thing”.
3) Interpret this portion of your picture into a quilt.
4) Size is totally up to you. Make it a size you’ll love and want and use.
You can use any colors and fabrics you desire. You can embellish or not as you see fit. Use any technique that’s fun for you (or try a new one you’ve been wanting to play with).
 from http://modern8create.blogspot.com

This is a picture of a metal picture frame with magnetic dots that hold the picture to the metal.  I hardly ever have a picture on it since I love the art of it just the way it is.  So, let me go play with the cropping and I will be back. . . Once again, I am leaving you.  This is a great time to get yourself that cup of coffee or take a bathroom break.  We will meet back here in just a couple of minutes.  See you . . .

I don't know what I pushed, I played with all kinds of editing buttons, but the background looks really yellow now.  It's a wonderful medium gray in the original form.  Even though I like this, I am not sure that this is what I want to do.  I may have to play with this some more or possibly take another picture of something more normal.  That may be the trick to the entire thing. Using something so normal and then closing in on it to make it look different.  I am off to play with this some more.  No, I am not coming right back this time, so finish that cup of coffee and go check out the two blogs I linked to and try your hand at these two challenges. 

Monday, February 27, 2012

Round Robins

This is the second half of the previously deleted/not saved posting.  Miracle of miracles, that posting was saved, but never published.  So for your viewing eyes, here is the rest of the previously delet.......  

I was to tired to re-write this part of the posting so I am really glad that this part saved.  I thought I was going to have to re-do this part and I didn't know when I was going to be able to get back on here and type.  Of course, whenever it would have been, would have been better than I am typing tonight.  I have never had sooo many mess-ups that I have had to delete and re-type.  I guess I really need to get to bed. 

In our Bee Friends Quilt Group this year, we are making round robin quilts again.  We haven't done this in about 10 years or so and many of our group have never participated in a round robin quilt and wanted to try one.  I love doing round robin quilts.  They challenge you to be extra creative and make you do your best work since you are working on someone else's quilt.  They also challenge you to use fabrics and colors you might never have thought about using.  Sometimes you love the block you receive and sometimes, it has to sit on the design wall for a couple of weeks before you force yourself to work on it because it just isn't your style.  Well, with round one out of the way, I am pleased with the work I did on my friends block.  However, just to make my life more fun and challenging, I am following all our round robin steps and creating my own quilt top here at my house.  I don't know what to call it since it's not making the rounds with someone else, but I am adding a border "around" the block.  Maybe in a couple of weeks I will  have come up with a clever name for this quilt, but for now, this is my "round robin". 

Our first instructions were to put our blocks on point.  I drew out my block on these wonderful graph cards and drew out a design to put my block on point.  Now that it is on the design wall, I am liking the look of this little top.  I have already drawn out the next round, but haven't made it yet since we haven't passed our other blocks.  We won't pass them on until almost the end of March, but I won't wait that long to add my next round on here.  I was going to add whatever I added to the robins to my quilt top, but decided that it needed it's own designs. since none of the original blocks looked just like this one.  I can't wait to see what this grows into. 

Wednesday, February 8, 2012

Pillow Covers and Round Robins


 I made my first pillow cover for the Stocking Swap this weekend and quilted it while watching the Superbowl.  This is my version of a cone flower pillow that I had seen on All People Quilt.  When I first saw that pillow, I loved it, but didn't bookmark it so I had to hunt for the link so I could post it.  However, it stuck in my mind and this is my version.  I think they are both whimsical and I love whimsical things.  I don't know if I will include this in my Stocking Swap or not.  It may have to live here with me. 
my version of a cone flower pillow
The back of the my pillow has a strip of fabric because I didn't have enough fabric - no, that's not the truth - I didn't cut out the fabric the correct way and when I discovered my mistake, then I didn't have enough fabric.  This fabric is definitely directional so I could either add a strip or two or having everyone turn their heads to read the words on this pillow.  You can plainly see what I decided to do.  The strip of fabric is one that I rejected for the leaves because it was too similar to the flower base. 
back of the cone flower pillow

Once the cone flower pillow was done, I got on the computer and started looking for more ideas for pillows so I could reference them here and everyone could have some inspiration from those pillows.  However, I got the inspiration.  I found an owl pillow made by Darci on flicker that I pinned to my pinterest board.  (sorry, I can't find it again to give you the link)  Then, I immediately had to make this pillow.  I don't think I am obsessed with owls, but I sure have made a lot of owlish items here lately.  I LOVE this little pillow!!  He is just adorable.  I haven't really decided if is a boy or girl owl, but since I have mostly boy dogs, things usually get called he more often that she.  I even sometimes tell Fiona what a good boy she is or to go outside and be a good boy.  I am a horrible mother.  Anyway, back to this pillow.  It goes together fast and easy and was a ton of fun.  The "hood" "flap" or whatever you want to call that peaky point on the owls forehead is not attached to the pillow and flips up and down.  That may have to be tacked down later so it will stay in one place. 

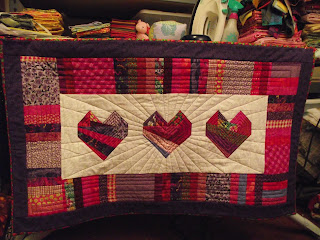
I have been a busy, busy bee in the quilting room this past week.  I finished quilting the rest of this quilt.  I like how I quilted the heart centers.  The only thing left to do, is to sew down the label on the back.  It will have to wait until tomorrow night during TV time.  Plus, I really don't have anything else lined up to work on tomorrow night. 

Below is a close-up of one of the hearts.  Thank goodness you can't see any stray pink marking lines from the heart rays.  I think those are on the other end of the quilt. 


My Bee Friends group are starting a wall hanging round robin this month.  So, I made two different blocks and now I can't decide which one I want to use.  I like this one below.  It is very modern using Kona solids - even though the colors are waaay off in this picture.  I drew out the blocks so I could paper piece the corners and center squares.  The star points are free pieced so they aren't even or perfect.  


This cake stand block is what I first thought of for my robin center.  I wanted a 5 inch block, but couldn't find one.  I drew it out on a graph card (I will talk more about these in a future posting) and thought I had everything down perfect.  However, when I sewed it all together I really, really lost my bottom tips.  I took it apart, made the white setting triangles a little larger and sewed it back together - - - and I still don't have my points on the bottom row.  I have thought about starting all over, but I really don't want to do that.  I think I may go with this block anyway because I really, really like it. 


I may get to use both of these blocks if we don't have someone in our Bee Friends to make up the 4th spot in our third group.  I could live with that.  Even though it means that I will be working on two round robins, plus everything else I am doing, but it would be interesting to see what both these blocks inspire in someone else.