Monday, February 27, 2012

Round Robins

This is the second half of the previously deleted/not saved posting.  Miracle of miracles, that posting was saved, but never published.  So for your viewing eyes, here is the rest of the previously delet.......  

I was to tired to re-write this part of the posting so I am really glad that this part saved.  I thought I was going to have to re-do this part and I didn't know when I was going to be able to get back on here and type.  Of course, whenever it would have been, would have been better than I am typing tonight.  I have never had sooo many mess-ups that I have had to delete and re-type.  I guess I really need to get to bed. 

In our Bee Friends Quilt Group this year, we are making round robin quilts again.  We haven't done this in about 10 years or so and many of our group have never participated in a round robin quilt and wanted to try one.  I love doing round robin quilts.  They challenge you to be extra creative and make you do your best work since you are working on someone else's quilt.  They also challenge you to use fabrics and colors you might never have thought about using.  Sometimes you love the block you receive and sometimes, it has to sit on the design wall for a couple of weeks before you force yourself to work on it because it just isn't your style.  Well, with round one out of the way, I am pleased with the work I did on my friends block.  However, just to make my life more fun and challenging, I am following all our round robin steps and creating my own quilt top here at my house.  I don't know what to call it since it's not making the rounds with someone else, but I am adding a border "around" the block.  Maybe in a couple of weeks I will  have come up with a clever name for this quilt, but for now, this is my "round robin". 

Our first instructions were to put our blocks on point.  I drew out my block on these wonderful graph cards and drew out a design to put my block on point.  Now that it is on the design wall, I am liking the look of this little top.  I have already drawn out the next round, but haven't made it yet since we haven't passed our other blocks.  We won't pass them on until almost the end of March, but I won't wait that long to add my next round on here.  I was going to add whatever I added to the robins to my quilt top, but decided that it needed it's own designs. since none of the original blocks looked just like this one.  I can't wait to see what this grows into. 

Sunday, February 26, 2012

Last Call for Pillow Covers


I don't know about you, but I really hate it when I write a perfectly wonderful blog and then it doesn't save and it won't publish.  I am now, re-writing this same blog posting again.  Okay, it won't be the same at all.  It will have some of the same words in it and it will definitely have the same pictures, but it won't have the same tone or wittiness.  I was quite funny in the first one, but now, I am tired and you won't get to have all the fun jokes and the humor, sorry. 

 blah, blah, blah here is a pillow cover I made, blah, blah, blah. 


the end. 

Not really, I will write a proper posting.   (Ooh, that sounds quite British - proper posting) Of course it's with a very southern Texas Drawl, too. 

Have you been working on your pillow cover for the Stocking Swap this month?  You only have a few more days to get it finished so we can move on to March's project.  Even though I  have already made a couple of pillow covers, I had been wanting to make one with a ruffle or a flange.  So, here is the one I made with a very ruffly, ruffle.  I won these fabrics in a raffle a couple of years ago and the main reason I put my ticket into the bucket was because of these fabrics.  I am always needing lights and never have any on hand.  So, when I saw these fabrics, I put in my ticket and voila!!  I won!  . . . . and I don't really know what to do with them since they are so not my style of fabric.  I thought they would look great in a pillow so I played around making a basic 9 patch and then wonky log cabined with some yellow and blue to get the right size.  The ruffle is with two different fabrics and even though these fabrics would not be my first choice


Wildlife at Mitre Peak 2012

Last weekend was the Kathy and Nathalie quilt retreat we hold annually (well, if we get our act together that year) at the Girl Scout Camp in Mitre Peak.  As always, we see lots of cattle and wildlife while sitting in our large, well lit room, sewing away.  This year was no exception.  While driving into the camp there were several cows sitting beside the road (I am on their property so there aren't any fences).  But since I took lots of pics of them last year, I didn't want to take any more this year.  However, there were tons (okay 0 about 8) javelinas beside the road.  They are more fun for me to see and take pictures of since we don't see them very often.  (In real life, usually we see them at least once when we are at the quilt retreat)  They were so close to the road that I didn't have to use my zoom to get great pics of them.  They started to walk away as soon as they heard the window roll down, but just driving through didn't seem to faze them. 


Here is a picture of Mitre Peak as I was driving in.  It was a cloudy day and this picture almost makes it look like it's an active volcano!!  It's not, just lots of low clouds hanging around and giving it that hazy look.  It was really more beautiful than this picture shows. 

Saturday morning as I was going to my car, these Tom Turkeys were out in the side yard between our house and the barn.  I watched them the entire way to my car and they kept coming closer and closer to me.  I got a little frightened the closer they got that they might try to attack me.  Nope, they just set up camp behind my car.  I don't think they wanted me to leave.  They truly are beautiful when they flare out their feathers.  It makes a ruffly sound when they do that.  We observed them later with their "girls" and they would ruffle their feathers to get the girls to move where they wanted them to move. 


Quilt retreat was a lot of fun and I got a lot done.  I would show you everything, but some of it was part of a challenge and I can't show that yet.  Another part was a quilt that needs two borders added.  The rest was an ongoing project that will need to be finished by April (at least the top needs to be finished)  I hope to get it completely done during Spring Break.  Come on Spring Break!! 

Wednesday, February 8, 2012

Pillow Covers and Round Robins


 I made my first pillow cover for the Stocking Swap this weekend and quilted it while watching the Superbowl.  This is my version of a cone flower pillow that I had seen on All People Quilt.  When I first saw that pillow, I loved it, but didn't bookmark it so I had to hunt for the link so I could post it.  However, it stuck in my mind and this is my version.  I think they are both whimsical and I love whimsical things.  I don't know if I will include this in my Stocking Swap or not.  It may have to live here with me. 
my version of a cone flower pillow
The back of the my pillow has a strip of fabric because I didn't have enough fabric - no, that's not the truth - I didn't cut out the fabric the correct way and when I discovered my mistake, then I didn't have enough fabric.  This fabric is definitely directional so I could either add a strip or two or having everyone turn their heads to read the words on this pillow.  You can plainly see what I decided to do.  The strip of fabric is one that I rejected for the leaves because it was too similar to the flower base. 
back of the cone flower pillow

Once the cone flower pillow was done, I got on the computer and started looking for more ideas for pillows so I could reference them here and everyone could have some inspiration from those pillows.  However, I got the inspiration.  I found an owl pillow made by Darci on flicker that I pinned to my pinterest board.  (sorry, I can't find it again to give you the link)  Then, I immediately had to make this pillow.  I don't think I am obsessed with owls, but I sure have made a lot of owlish items here lately.  I LOVE this little pillow!!  He is just adorable.  I haven't really decided if is a boy or girl owl, but since I have mostly boy dogs, things usually get called he more often that she.  I even sometimes tell Fiona what a good boy she is or to go outside and be a good boy.  I am a horrible mother.  Anyway, back to this pillow.  It goes together fast and easy and was a ton of fun.  The "hood" "flap" or whatever you want to call that peaky point on the owls forehead is not attached to the pillow and flips up and down.  That may have to be tacked down later so it will stay in one place. 

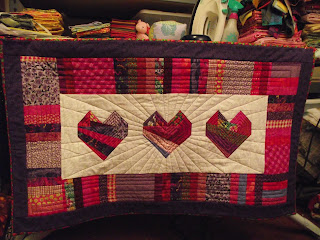
I have been a busy, busy bee in the quilting room this past week.  I finished quilting the rest of this quilt.  I like how I quilted the heart centers.  The only thing left to do, is to sew down the label on the back.  It will have to wait until tomorrow night during TV time.  Plus, I really don't have anything else lined up to work on tomorrow night. 

Below is a close-up of one of the hearts.  Thank goodness you can't see any stray pink marking lines from the heart rays.  I think those are on the other end of the quilt. 


My Bee Friends group are starting a wall hanging round robin this month.  So, I made two different blocks and now I can't decide which one I want to use.  I like this one below.  It is very modern using Kona solids - even though the colors are waaay off in this picture.  I drew out the blocks so I could paper piece the corners and center squares.  The star points are free pieced so they aren't even or perfect.  


This cake stand block is what I first thought of for my robin center.  I wanted a 5 inch block, but couldn't find one.  I drew it out on a graph card (I will talk more about these in a future posting) and thought I had everything down perfect.  However, when I sewed it all together I really, really lost my bottom tips.  I took it apart, made the white setting triangles a little larger and sewed it back together - - - and I still don't have my points on the bottom row.  I have thought about starting all over, but I really don't want to do that.  I think I may go with this block anyway because I really, really like it. 


I may get to use both of these blocks if we don't have someone in our Bee Friends to make up the 4th spot in our third group.  I could live with that.  Even though it means that I will be working on two round robins, plus everything else I am doing, but it would be interesting to see what both these blocks inspire in someone else. 

Sunday, February 5, 2012

February Stocking Swap

It's February and time for our next item on the swap list, a pillow cover.  This months goal is to make a pillow cover for a 14 inch pillow form.  To tell the truth, I have only made one pillow cover, that I can think of, in my life.  I really messed up on the back part and desperately need to add a button or two to hold it together, but I still love my pillow. 

Wonky Log cabin pillow
After reading through a few blogs about making pillow covers, I have compiled some measurements that will help us to get our pillow cover backs to come together - right now, over me - sorry, the Beatles just snuck in there.  I haven't tried this out yet, that is what I plan on doing today while watching the Superbowl, so I will let you know for sure if these measurements don't work.  The front of the pillow should be cut about 15 inches.  You need to cut two backs 15" X 10" to make an envelope style back.  I don't think that is the right name for the back.  However, I can't come up with any other name off the top of my head.  You know the type of back - the kinds that overlap in the middle of the pillow so you can slide your form easily inside.  I will be posting more about pillow covers for this month, later.  Now, I want to see what I can come up with in my quilt studio.